Friday, February 27, 2015

Couscous Mexican Bowl

This is perfect for quick lunch or diner. There is so many ways you can make this but I go for this way and believe me with chopping and cooking and eating it was done in 10 minutes. It was Thursday night and that's Mexican food night in my house since so long but didn't wanted to go for any cheesy mexican dishes so take a spin of regular couscous salad to Mexican way. Only thing I was missing was Avacado. You can chopped in bite size pieces and put it on top and it taste amazing so next time when  I will make this, I will make sure I have avocado to put it

Ingredients :

1 onion chopped
1 carrot chopped
3-4 garlic cloves chopped
1 Jalapenos chopped
1 Red pepper chopped
4 tbsp. Black beans boiled
4 tbsp. corn ( I used frozen)
1 can of Vegetable Broth
1 cup of Couscous
1 tbsp. Taco seasoning
1 tsp. Garlic powder
1 tsp. paprika powder
1 tbsp. oil
Salt to taste
Fresh coriander leaves chopped
Salsa

Method:

Heat a pan, Add oil in it.
Add garlic and jalapenos and cook it till oil gets all the flavor.
Add Onion and cook till its little pink.
Add one by one all vegetables and cook.
Add beans and corn and mix it.
Add taco seasoning, garlic powder and paprika powder and salt.
You are going to add can vegetable broth and it has sodium in it so keep that in mind, If you are using plain water then add salt that way.
Add whole can of broth and give a quick stir and let it come to little boil.
Add couscous and mix and cover the lid and shut off the gas.
Leave it as it is for five minutes.
After 5 minutes, take the lid off, sprinkle coriander leaves, lime juice, and fluff it with fork.
To serve take a bowl, take couscous, sprinkle more coriander leaves, fresh chopped jalapenos, salsa on top and enjoy.


Hearth & Soul HopLink up your recipe of the weekFirst blog Anniversary and giveawayCredit-Crunch-Munch

Wednesday, February 25, 2015

Sargava Nu Shak | Drumstick Curry

When I talked to my Gujarati friends or family, they always says that they made drumsticks curry with besan, I never had it that way, so mine reply was always this that use less besan and make this curry with more vegetables in it. That's how my mom feed us and I remember it that way too. She used to put whole shallots in it and me and my sister used to fight about that who gets more shallots because its so soft and you just loved that melt in your mouth onions. But I didn't had small ones so I used regular ones but chopped in big cubes and still taste amazing. You won't believe this is my kids favorite vegetable, they are very picky but loved this one, I can feed them every day, so I always have this in my frozen because its easy for my weeknights meals , I don't have to cut and clean , just open up packet, take what I need and rest go back inside. That's why I love frozen vegetables, you will get year around and use it when ever you want.

Ingredients 

1/2 bag of Frozen Drumsticks
1/2 cup frozen tuver lilva - fresh taste better, but here I used this one. (pigeon peas)
2 onions - 1 chopped finely and 1 chopped in big chunks  or if you have shallots then only one onion for tadka and few whole shallots for curry
1 potato cut in 8 pieces
2 tbsp. tomato puree
1 tbsp. ginger, chili , garlic paste
1 tsp. cumin coriander powder
1 tsp. turmeric powder
1 tsp. garam masala powder
2 tsp. red chili powder or as per taste
Salt as per taste
2 tbsp. oil
Lime juice as per taste

Method:

If you are using fresh vegetables, wash and cut drumsticks in pieces and peel the pigeon peas.
If using frozen take it in colander and wash it and keep it aside.
Heat a oil in pan.
Add chopped onions in it and cook till becomes little pink in color.
Add ginger, chili garlic paste, along with all powder spices and tomato puree and cook till oil separates.
Add drumsticks and peas, chopped potatoes, big chunks of onion and salt and enough water to cook it and cover the lid.
In between stir it so it doesn't stick .
You will get thick gravy. Once its done, sprinkle some lime juice and have it with hot rotis or rice.


Hearth & Soul HopLink up your recipe of the weekFirst blog Anniversary and giveawayCredit-Crunch-Munch


Monday, February 23, 2015

No Bake Cannoli Cheesecake

After tiramisu this is my favorite Italian dessert. But I don’t like traditional way to eat it, first I don’t have
those mold to shape it and second I have to fry those and I always run away if I have to fry anything.
Since my sister made bite size cannoli I wanted to make that and did that and enjoy it, and it left me
craving for more.  So when I made my ricotta cheese  and used it in recipe , still had some leftovers to
use it. As you know, I don't like leftovers, so before it goes bad, I have to use it and thought lets make no
bake cheese cake. What not to love about this, it has ricotta cheese, whipped cream, waffle and
chocolate chips, tell me you all , if you don't like any of these things. ? Well I like all. I use my frozen
chocolate chip waffle as a base, but you can use any chocolate wafers or vanilla wafers or Nila cookies.

Generally in cheesecake only in the bottom we put crust, but in this one I layered it but if you don't want
to do that way, you can just put in the bottom.

Ingredients :

2 frozen chocolate chip waffles – toast it and keep it aside.
½ cup Ricotta cheese
½ cup whipped cream
2-3 tbsp. sugar or as per taste
¼ cup Chocolate chips
For garnish – any dark hard chocolate slab

Method:

In a bowl, add ricotta and whipped cream, add sugar in it and mix it till sugar melts.
Add chocolate chips in it. And fold it
Take two shot glasses or bowl , in which you want to make cheese cake.

Make pieces of waffle and put it in bottom.

Scoop ricotta mixture and put it on top, If you want to do layers, put one big tbsp. of ricotta mixture and

again a few pieces of waffle and again ricotta. The top layers should be Ricotta. Garnish with dark chocolate

shavings and few more chocolate chips.

Put it in the fridge for 1 hour and that will be the most difficult time in your life that day to wait for it.

After that, take out the glass and enjoy the yummiest and easy and quick dessert.


Oh you welcome

Hearth & Soul HopLink up your recipe of the weekFirst blog Anniversary and giveawayCredit-Crunch-Munch

Friday, February 20, 2015

Semi Homemade Empanadas

Now my weekday schedules are changed, due to work. So I am always in hurry to make something fast and healthy and easy on weekdays. I make first kids so they can eat and go to sleep, Mine can wait since I eat once kids go to bed. But still its not like before when I used to make dinner in the afternoon and then have quality time with kids in the evening, but still I am enjoying my new schedule. So now when I am thinking about dinner ideas, it has to quick too. This is semi homemade because I used ready made biscuit from pillsbury instead of making dough and do it. But the best part was it was corn biscuits so it tasted awesome too. I shared it with my co worker who is from South America, and he appreciated very much , so felt good too. I used Mexican stuffing, you can use any meat and cheese, or even make it as baked samosa with the same biscuits.

Ingredients :

1 packet of Corn Biscuits from Pillsbury
Grands Homestyle Corn Biscuits

For Stuffing :

1 each onion, capsicum, carrot, zucchini (chopped)
1/4 cup frozen or fresh corn (if using frozen , thaw first)
1/4 cup soya granules
1/4 cup black beans
2 tsp. Taco Seasoning
2 tsp. chopped garlic
1 jalapenos chopped
1 tsp. oil
salt to taste

Method:

Let's make stuffing first.
In a pan add oil , add garlic and sauté for 30 seconds, then add jalapenos, cook for 30 seconds.
Add onion, carrot, corn, zucchini, capsicum, soya , black beans and mix it.
Add taco seasoning and salt and cook it for 5 minutes, you don't want to over cook veggies because it will cook later on in the oven also.
Keep it aside and open so it cools quickly.


You don't want to wait more when you are hungry.
When its about to cold. pre heat the oven at 375 F.
open the can as per package instructions.
Take one biscuit out and roll it with rolling pin and make it thin and big.
Take 2 tbsp of stuffing and put it in middle.
Seal the edges nicely and put it on baking dish.
Do with rest of the 7 biscuits.
Put it in the oven and baked it till its nice and brown for about 13-15 minutes.


See they are working for you.
Take it and let it cool for sometimes.


Serve it with salad, salsa and sour cream and pickled jalapenos.
Diner is served.


Hearth & Soul HopLink up your recipe of the weekFirst blog Anniversary and giveawayCredit-Crunch-Munch


Wednesday, February 18, 2015

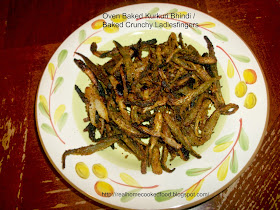
Oven Baked Kurkuri Bhindi / Baked Crunchy Ladiesfingers

One day I was talking on phone to my parents back home in India, after some chit chat, my dad said one sec, mom wants to tell you something, those kind of sentences makes me worried , about their health or some bad news. So when Mom came on line, she said Beta , we saw one recipe on tv and it looks so good and sound so good, we wanted to let you know, if you want to try it, I was relieved that its nothing serious. Then I asked for what's the name and recipe and it was kurkuri bhindi and she explained me receipe, I said its very old and everyone is making it? so my dad said why don't you make something different out of it and that makes my brain started thinking , I said ok will see.  Since then I didn't got bhindi, because it was not that good, I wanted long, thin ones. So when I saw nice bhindi in store, got it and made it in the evening for my dinner, but it was so crispy so instead of having it with usual dal roti dinner, I had it with Rajma chawal and top it with crunchy bhindi. It was delicious, you can make some dip with yogurt and have it as party appetizer too.

Ingredients :

10-15 Bhindis / Ladies fingers
1 tbsp. Besan / Chickpea flour
1 tsp. Turmeric powder
1 half  onion , match stick chopped  (optional)
1 tbsp. Red chili powder
1 tsp. Chat powder
Salt as per taste
1 tsp. Black salt or Aam chur powder (Dry mango powder)

Method:

Heat the oven at 350 F.
Take your baking dish. Wash and clean your bhindi.
Take Bhindi / Ladies Fingers and cut the top off. Cut it in half and make two slices of one half and same with other half so you will have four slices from one Bhindi.
Add one by one powder masala and last besan and mix it.
If adding onion, add it now.

Leave it out for 10-15 minutes.
After that put it in oven and cook till its nice and crunchy.
Meanwhile take it out  from time to time and mix it so it cooks from all side.
It took 30 minutes to get my desire crunchiness , but its depend upon you and oven.
Enjoy it as side dish or appetizer with any dip or just raita.


Hearth & Soul HopLink up your recipe of the weekFirst blog Anniversary and giveawayCredit-Crunch-Munch
A2K - A Seasonal Veg Table: Eat Your Greens

Monday, February 16, 2015

Fatteh : Middle Eastern Baked Chickpeas

Some  countries cuisines are very similar to Indian Cuisines. One of them is Middle Eastern, They used whole spices more in their recipes and who don't like their hummus, falafel and other dishes. I saw this dish and instantly made it ,because I always have boiled chickpeas in freezer. I got the whole 4 lbs. chickpeas , soak them, boiled them and store in it freezer, so when ever I need it , just make the masala for indian food or for salad , just thawed and have it, no worry about if I forgot to soak the night before. So I took out my chickpeas and thawed it and made this amazing dish. Only thing was I was out of pita so I crispy tortilla and have it but for the true taste have it with pita.  This is very famous middle eastern dish which cooked with chickpeas, spices and baked it and then top it with sour cream or yogurt, I had greek yogurt on top .

Ingredients :

2 cups of Cooked Chickpeas or you can use 1 can, drained and rinsed
1 cup Greek or plain yogurt or sour cream
1 small onion, chopped
3 cloves of Garlic, finely chopped
1 tsp. cumin
1 tsp. smoked paprika or Indian red chili powder
1 tsp. coriander powder - I grind fresh both , cumin and coriander
1 tsp Tahini
1 tsp. lemon juice
1/2 cup toasted pine nuts - I didn't add it.
2 tbsp. olive oil
Freshly chopped parsley or coriander leaves
As per taste salt and black pepper
2 Pita , cut into wedges


Method:


Preheat the oven to 350 F.

Put the pita on a baking tray and bake for 10 minutes or until it's lightly browned and crispy. Remove from the oven and set aside.

While pita is baking, in a pan, add olive oil and add onions in it. 
Cook till its browned.
Add all the powder spices, and garlic cook for a minute. Then add chickpeas in it. 
Take it out, add tahini, lemon juice, salt and pepper and drizzle some olive oil.
Put everything in baking dish and bake for 10 minutes until everything is cooked through. 
Remove from the oven and take it out in bowl, spread yogurt on top and put parsley or coriander leaves on top and put the pita wedges on side and enjoy your lovely dinner. 

Inspired from here